Saturday, February 26, 2011

Extensive Mould Temperature Test & Results – Finding the Mould Temperature Sweet Spot

What is the optimum mould temperature to produce the best bullets possible?  After testing temps of alloys and how it affected bullet diameter, folks wanted even more test results, this time focusing on the mould itself.  Here it is!

The first challenge and what prevented me from doing this before is the problem of accurately measuring mould temperature.  The answer is the NOE Digital Casting Thermometer.  It attaches to the mould by inserting the probe into the mould, once drilled using the supplied drill bit.  There are instructions on where to place it on NOE moulds.  It’s easy enough to determine positioning on other brand moulds too.   

This is the unit and its components:


Here’s how it looks inserted into the mould:


Positioning the unit properly while casting keeps the wire out of the way and made it very easy to use.  It worked well with my casting process which is:
  1. I cast with the pot to the left (this is to give you an idea how it worked)
  2. Let the sprue firm up and “suck” itself in
  3. Flip the mould and with a whacker drop the sprue into a container one step to the right
  4. Sprue side down and with the mould held close to a drop cloth, drop the bullets
With this process, moving from left to right, the digital unit works well position just to the right of the drop cloth, at drop cloth level.  It keeps the wire out of the way and makes for a quick temperature check after dropping the bullets.  Very nice!

Note, this an important point: the test results must be adapted to be effective during a casting session.  I've also notice a variaton between different thermometers, so your best temps should verified and adjusted if needed.  

Also, all testing and results is with 98% lead and 2% solder.  This alloy likes things a bit hotter than harder alloys, such as wheel weights.

When preheating the mould (hot plate or dipping into the alloy) the cavity temperature is a bit cooler than the mould block itself.  The temps in the charts during the test are mould block temps, the cavity is a little cooler.  I decided to be consistent and report what the actual mould temps are during testing.  I will explain how to adapt for a casting session in just a minute
.
First, the test process for my test mould (358-429 aluminum 5 cavity from NOE);

Preheat the mould to the desired test temperate by heating it on a hotplate.  As the temps increased it had to be  dipped  it into the alloy for the hotter tests.

The results are in following three separate charts:
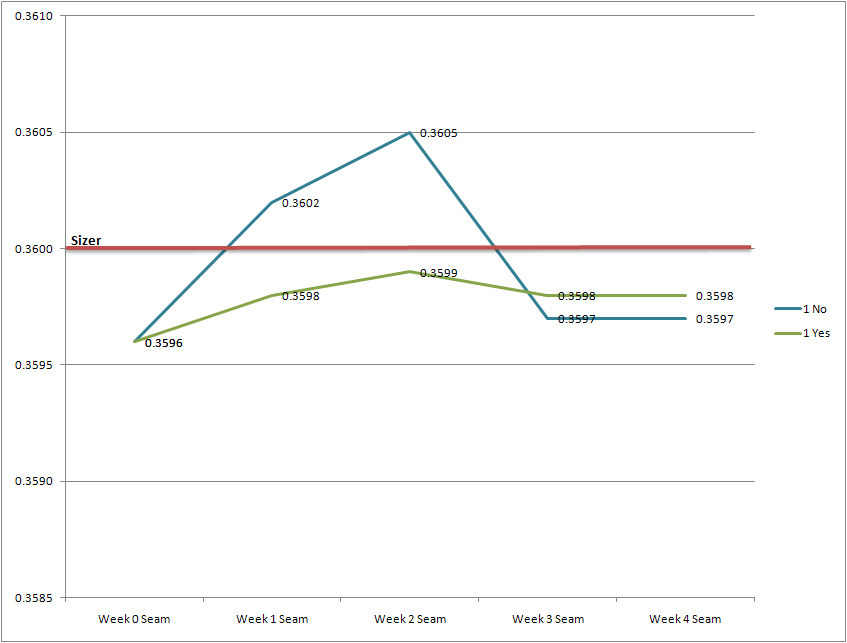
  1. Bullet diameter measured on the casting seam
  2. Bullet diameter measured 90 degrees across the seam (cross)
  3. The difference between the two diameters or the amount the bullet is out of round
The diameters measured on the seam (big is best):


The diameters measured across the seam (big is best):


The amount “out of round” (small is best):


Click on any picture or image to see a larger full size version.


The best bullets, the biggest and most round, result from a mould preheated to 440 degrees.  Hotter than that and the roundness and overall size falls off quickly.  

The window for the absolute best result is very narrow.  That can be a challenge.  Maintaining the optimum temp by feel and experience is good, but not the best solution.  I now use the Digital Casting Thermometer all the time, because it works well.  It's all about great results.

Now, how does this work in a real casting session.  It turns out that while casting, the heat is now coming from the cavity instead of outside the cavity.  The cavity and mould temp are now much closer to each other.

With that in mind, keep the mould between 410 and 420 to produce absolutely terrific bullets.  They are very round, as good as the best test results, full sized too.  Some early signs of frosting may show, without impacting bullet quality at all.

The actual in-cavity temperature is 420 degrees as well.  Verify it with a kitchen flat bottom thermometer to get started, if that's what you have on hand.  The Digital Casting Thermometer makes getting started and then maintaining the optimum temperature a breeze.

Added:  Lyman steel moulds work well preheated to 380 degrees, using the kitchen thermometer insterted into a cavity.
 
Heating the mould hotter than 420 degrees produces frosted bullets and the results are not as round and are not fully sized.
 
I found it was hard to keep the mould up to 420 degrees, luckily it didn’t need to be hotter.  At 520 degrees the squared grooves in the bullet design make it a bit tricky to get them to drop, but a couple of taps shakes them loose.  

The best solution proved to be; preheat to 420-430, using the Digital Casting Thermometer from NOE, and then pace the casting so the mould temp maintains 410-420 degrees.  The bullets and mould are into their “sticky” area at these temps, backing down a bit to 400-415 may help and won’t hurt the results.

Adjusting my process based on these test results, and using the thermometer has improved my casting and the bullets I produce. Pacing the casting process to maintain the perfect temperature works best.  Using a wet cloth to cool the mould was rarely needed, but with the thermometer all guessing and estimating is removed.  Speed up to get more heat and touch the mould to the damp cloth when it gets over heated.

Now I know the perfect temperature for a 358-429 aluminum mould.  I will also test others to verify their best casting tempurature, or to know their “temperature sweet spot”.  In any case, knowing the perfect mould temp produces better quality bullets, because they are fully sized and more consistent than ever.  

This translates to improved accuracy at the range.

Friday, February 18, 2011

357 Magnum Accuracy is About Semi-Wadcutters. Overview of Most Accurate Moulds.

Review the most accurate load chart just below, and it's glaring that semi-wadcutters (SWC) are at the top.  (Note the 358-429 is a Keith and a SWC.)  Testing has included round nose, flat nose and wadcutter designs as well.  Calling out moulds that aren't the most accurate isn't the goal here, so there won't be a long list of what hasn't worked very well.  But, there are many.

This is the current accurate load chart, it will we updated and posted to a page of it's own sometime soon: (click the Most Accurate Bullet Moulds and Loads Table at the top of the right frame for the latest load data, Also see the latest favorite mould list at Lyman 358-477 Added to Favorite Bullet Moulds and Loads.  Also look at a custom 358-429 from Mountain Molds)
RankMouldWeightGroupChargeOALVelocity
1360-200-SWC2000.573.4, 700XGroove660
2358-4291680.584.7, HP-381.620900
2358-4291680.585.1, 700X1.6201,200
3158-SWC TL1580.613.5 HP-381.600810
4358-4291681.0011.8, H1101.6201,260
5158-SWC TL1581.105.1 HP-381.6001,129
5148-WC TL1481.103.5 HP-381.400928
6360-145-SWC1451.203.9 700XGroove1,020
7358-4291681.3010.3,24001.620910
8140-FN-LBT1401.405.8 700XGroove1,347

Absence from the most accurate list means; they aren't that accurate or haven't been tested yet.  Not when shot from a rest at 25 yards, and multiple 5 shot groups measured with calipers.  Anyone can claim they shot off-hand (two handed & unsupported grip) and the gun shot better than they could, with any bullet.  Of course it does.  Remove the shooter from the equation as much as is afford-ably possible and run multiple tests, measure the groups with calipers and sort them.  That's the only way to correctly determine which moulds and bullet designs are the most accurate. 

The list I maintain is the very top of the tested-measured-sorted list, the most accurate cast bullets for your 357 magnum.

Various "max bullet in the chamber" designs as well as the standard flat nose, and various wadcutters have all been through the wringer.  There may be a few new designs that test well, but they would be big shock at this point.

Two big surprises are:
  1. Wadcutters aren't as accurate as SWC's
  2. Lighter bullets such as the 140, 145 and some 150 grain versions don't do all that well.  These are usually touted as the most accurate of all 357 bullets, but haven't proven it
  3. The Lyman 358-477 design at 150 grains is an exception and groups less than 1 inch
Two big learning points are:
  1. SWC's ranging from 158 grains to 200 grains are generally the most accurate, those and the Lyman 477 comprise 100% of the groups less than 1 inch
  2. Keith style/design bullets do very well, but note that other SWC's are also on the list too, see pictures below
Note: It's really the length of the bullets that is important, longer bullets weight more which is why the weight and length are related.  The length / diameter ratio has a lot to do with the accuracy.  While this isn't the only factor about bullet design that is important, it is one important and often overlooked factor.

Looking at the results, it's obvious that longer bullets are more accurate.  Also, a SWC is typically longer than a  flat-nose of the same weight.  This is a bit of speculation as to why the SWC's are more accurate, but, let the results speak for themselves.  Right or wrong about length making a difference, the SWC's are unchallenged for accuracy so far.

The three bullets below from left to right are:  360-200-SWC (200 grain SWC from a NOE mould), 358-429 (168 grain Keith is from a NOE mould, it has a shorter nose than the Lyman and may fit your gun better.  The longer Lyman design won't work in every 357, you have to test any 358-429 in your revolver or crimp it into the front driving band).  These are the top 2 accurate bullets I load and shoot.  The third bullet in the picture is from an very old Lyman 357-446 mould that drops a 162 grain SWC.  It's undergoing testing now.  Some others have reported excellent accuracy, others reported accuracy issues.  It's interesting to look closely at the three, as they are all very similar:


Here's a closer look at the 200 SWC, the best group I've every shot are with this bullet (by .01 inch):


A closer look that the 358-429 168 grain Keith which is also super accurate, and virtually in a tie with the 200 SWC.  Just .01 inch at 25 yards separates them, and that  is splitting hairs:


The other mould that groups less than 1 inch at 25 yards is a Lee 358-158-TL, which I don't have a photo of.  Here is the drawing from the Lee site.  It's very similar to the other SWC's except for the lube grooves.  If you don't mind tumble lubing, many folks like how easy it is, this is incredibly accurate and very inexpensive.  A six cavity mould creates a large pile of bullets quickly too.


The current mould/bullet in test is the old Lyman 357446, here's a closer look the bullet it produces:


All the pictures expand when you click on them.  Take a close look.  I really like the big squared lube groove of a Keith style SWC.  However the Lee is very different and is incredibly accurate as well.

If you are striving for the most accurate bullet/load in your 357 magnum a SWC from 158 to 200 grains is for you.  If you can buy these particular moulds, they are proven (pending results of the 446).  If you have one that looks very similar, you can use the "most accurate loads" and be close.  Then work up the perfect load for your revolver.  The specific design of the 358-477 is also a proven accurate bullet too.  Other designs in this size/weight haven't worked as well.

The Accurate Load chart will be updated soon.  It was to include early results with a new-to-me Dan Wesson with a 6 inch barrel.  The groove size of the Taurus is .357 while the Dan Wesson is a huge .3588.  The DW isn't liking the stiffer charges with fast powder.  The Taurus 66 6 inch has proven to be more accurate than any other 357 revolver I've shot.  Mine has .358 throats and at .357 groove, perfect for cast shooting.  Some other makes have optimized for jacketed to the point of affecting accuracy of cast bullets.

If you are in the market and want a very accurate 357, consider getting a long barrel Taurus.  Forget what everyone says about the other brands being better guns.  Get the Taurus and out-shoot them.

Just for fun here's a handful of the 168 grain Keith's, including the nasty looking one with the rounded base:

Saturday, February 12, 2011

Final report on the changing bullet diameter, sized and unsized. How to use it to improve accuracy.

The soft alloy that is so accurate in a 357 magnum drops from the mould a little smaller than harder alloys.  Having the optimum alloy is more important than the optimum size, so the soft alloy is the best approach.  You can then use the changing size to squeeze the last bit of accuracy out of the bullet.  Read on:

The final measurements of this test are in the chart below.  The blue is not lubed, the green is a lubed bullet.  Note the sizer line at .360 inch.  That's the actual measurement that my Lyman 450 sizes at.  Check yours as they can be vary a bit:


Click on the graph for a full size readable view.

In case you haven't had a chance to read the prior post, the blue line is a bullet that was unsized/unlubed measured on the seam for 4 weeks.  The green line is a bullet from the same cavity, cast a few seconds later.  It dropped at the same exact size, as you would expect.   Shortly afterwards the second bullet was put through a Lyman 450 Lubrisizer.  The sizing .360 die (the highlighted line) didn't change the size at all since the bullet was smaller.  FYI, the lube is Darr Lube, which is my go-to homemade lube.

The results are striking.  The lubed bullet stayed close to the same size, expanding a little bit and then constant.  The unlubed bullet grew above the .360 size, which works best for accuracy and is very useful.  What's also useful is the fact that once lubed the bullets stay fairly even over time.

Recognize that not every bullet grows the exact same amount.  Also recognize that a bullet doesn't expand/grow the same amount evenly.  The ideal process to use this new information is:
  1. Cast the bullets
    1. The 50/1 lead/solder alloy likes 900-975 degrees
    2. It also likes the mould preheated to 400 and kept between that and 420 (cavity temps).  There will be more extensive cavity temp test results coming as even hotter mould temps may offer some advantage.
    3. This is considered too hot by many, it isn't for this alloy.  Also, if you do everything the same way as everyone else, how will your bullets be more accurate than theirs.  Try casting with this alloy and see the results
  2. Put them into a glass jar or someplace they are open to the air
  3. Wait two weeks
  4. Size and lube
    1. Having the bullets at maximum size will allow the bullet to expand around it's entire circumference as much as possible
    2. They will then keep their .360 optimum size, although this calls for a test to see how long they are constant
They are now ready to load and shoot.  These are the most accurate bullets you can cast and put in your revolver.  Check prior posts to see which moulds are the best.

By following these steps the bullets will be fully and evenly sized, and very round.  This provides the consistency needed for excellent accuracy.

If you are casting with harder alloys, see if you can get some stick-on wheel weights or plumbers lead.  Validate for yourself that 98% lead 2% solder will shoot more accurately in a 357 magnum than other alloys.  The Accuracy Ladder in a prior post highlights exactly what is most important to cast the most accurate bullets possible for your 357 magnum.

Friday, February 4, 2011

The changing bullet diameter, sized and unsized. It can help, or it can ruin your groups.

Curiosity about how bullets change size over a period of a few weeks got me started on a test. With different bullets poured and measured all at the same time, some of the results are interesting. 

A good single representative view makes it easier to see what is going on. Other bullets followed a similar pattern, they vary a bit in the amount of change from week to week.

Here are 2 bullets from the same cavity of a 358-429 mould. The green line was lubed in a Lyman 450 with a .360 die within hours. The size remained the same because it wasn't big enough, but it was lubed. The blue line is the other bullet, unsized and unlubed. Maybe not the perfect scenario, but that's the way it worked out.

It's a three week period with each bullet measured on the seam.

Below is a description how this bit me: (click on the graph for a larger view)


Pretty fascinating.  The growth and shrinkage are different for bullets cast from the same cavity within seconds of each other.  The lubed bullet stayed consistent.  My assumption is the coating of lube protects the lead from the effects of air over the first few weeks.  However it matters less why this happens, just that it does.

The most accurate loads I have became erratic, producing a shotgun pattern instead of a tight group.  The cause was a change in my process, and related to the bullet growth in the chart.

In the past, the process that worked is:
  1. Cast a few hundred bullets
  2. Each week prior to shooting, lube/size & load 200 for the week

Pretty simple, each week I lubed and loaded the rounds for that week.

Then, in an effort streamline and improve things at bit, here's what didn't work:
  1. Cast, lube & size all the bullets
  2. Each week prior to shooting, load 200 for the week
Using the knowledge from the chart, the past process sized fairly large bullets, after they had aged (on a Lyman 450 lubrisizer).  It turns out sizing large bullets in this case produces bigger bullets than the sizing-aging approach. 

The new process produced bad results because it limited bullet size.  They never got big enough to produce the best groups at the range.

When groups of 1 inch or smaller are common, a 2.5 inch shotgun pattern is a huge disappointment. 

Finding and solving the problem is a reward all it's own.